How CodexStudio works
A quick tour of everything from your first chapter to a finished, continuity-perfect draft.
1. Getting started
Every story begins on your writing desk — the dashboard where all your books live.
- 1Create a free account with your email, and add a pen name if you'd like a public-facing identity.
- 2Click New project and give your book a title, genre and a one-line synopsis.
- 3Already have a draft? Use Import to drop in a .docx, .txt or .pdf — it's split into chapters and its details are extracted for you.
2. Plan with the Blueprint
The Blueprint is your bird's-eye view: a logline at the top, acts across the board, and chapter cards you can shape before you draft.
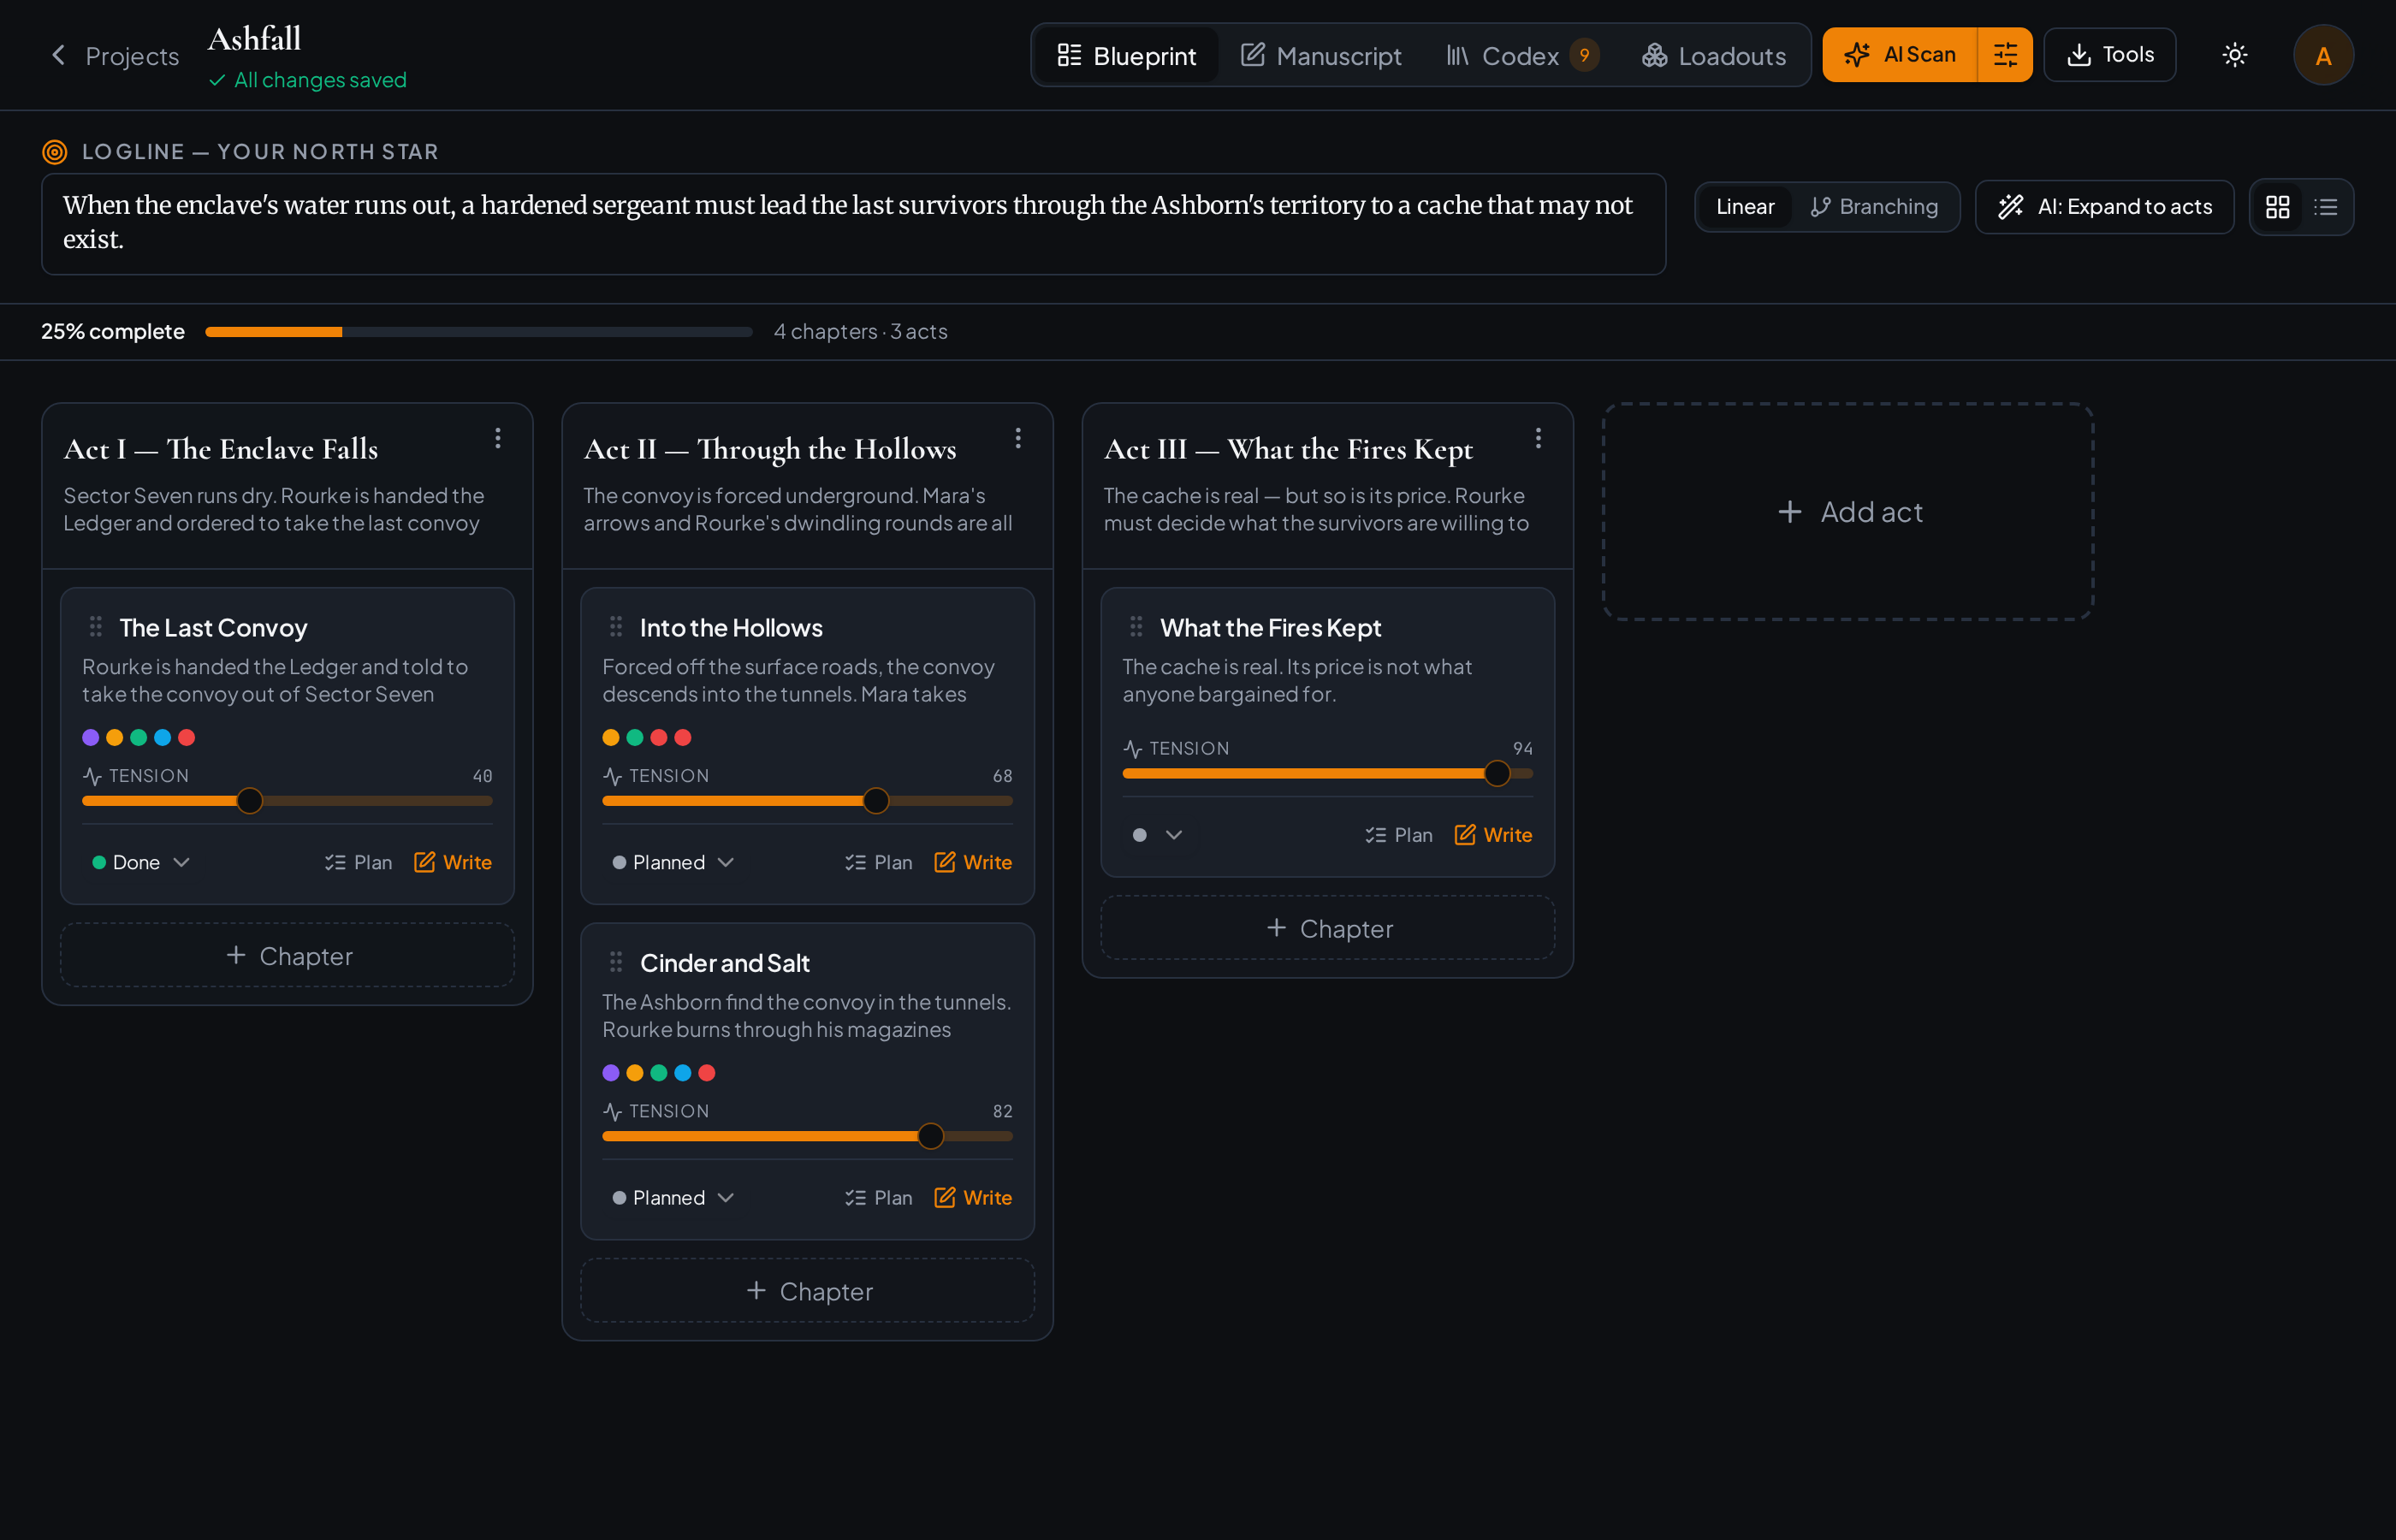
- 1Write a logline — your story's north star — then flesh out each act's pitch.
- 2Add chapter cards under any act, set a status (Planned / Drafting / Done) and slide the tension marker.
- 3Drag chapters between acts to reshape your structure, or switch to the outline view.
- 4Stuck? Hit AI: Expand to turn a logline into acts, or an act into chapters.
3. Detail-plan chapters with beats
Before you write a scene, sketch it out. The Beat / Scene Planner lets you list a chapter's beats as a simple, tickable checklist — with your logline, act and summary right there for context.
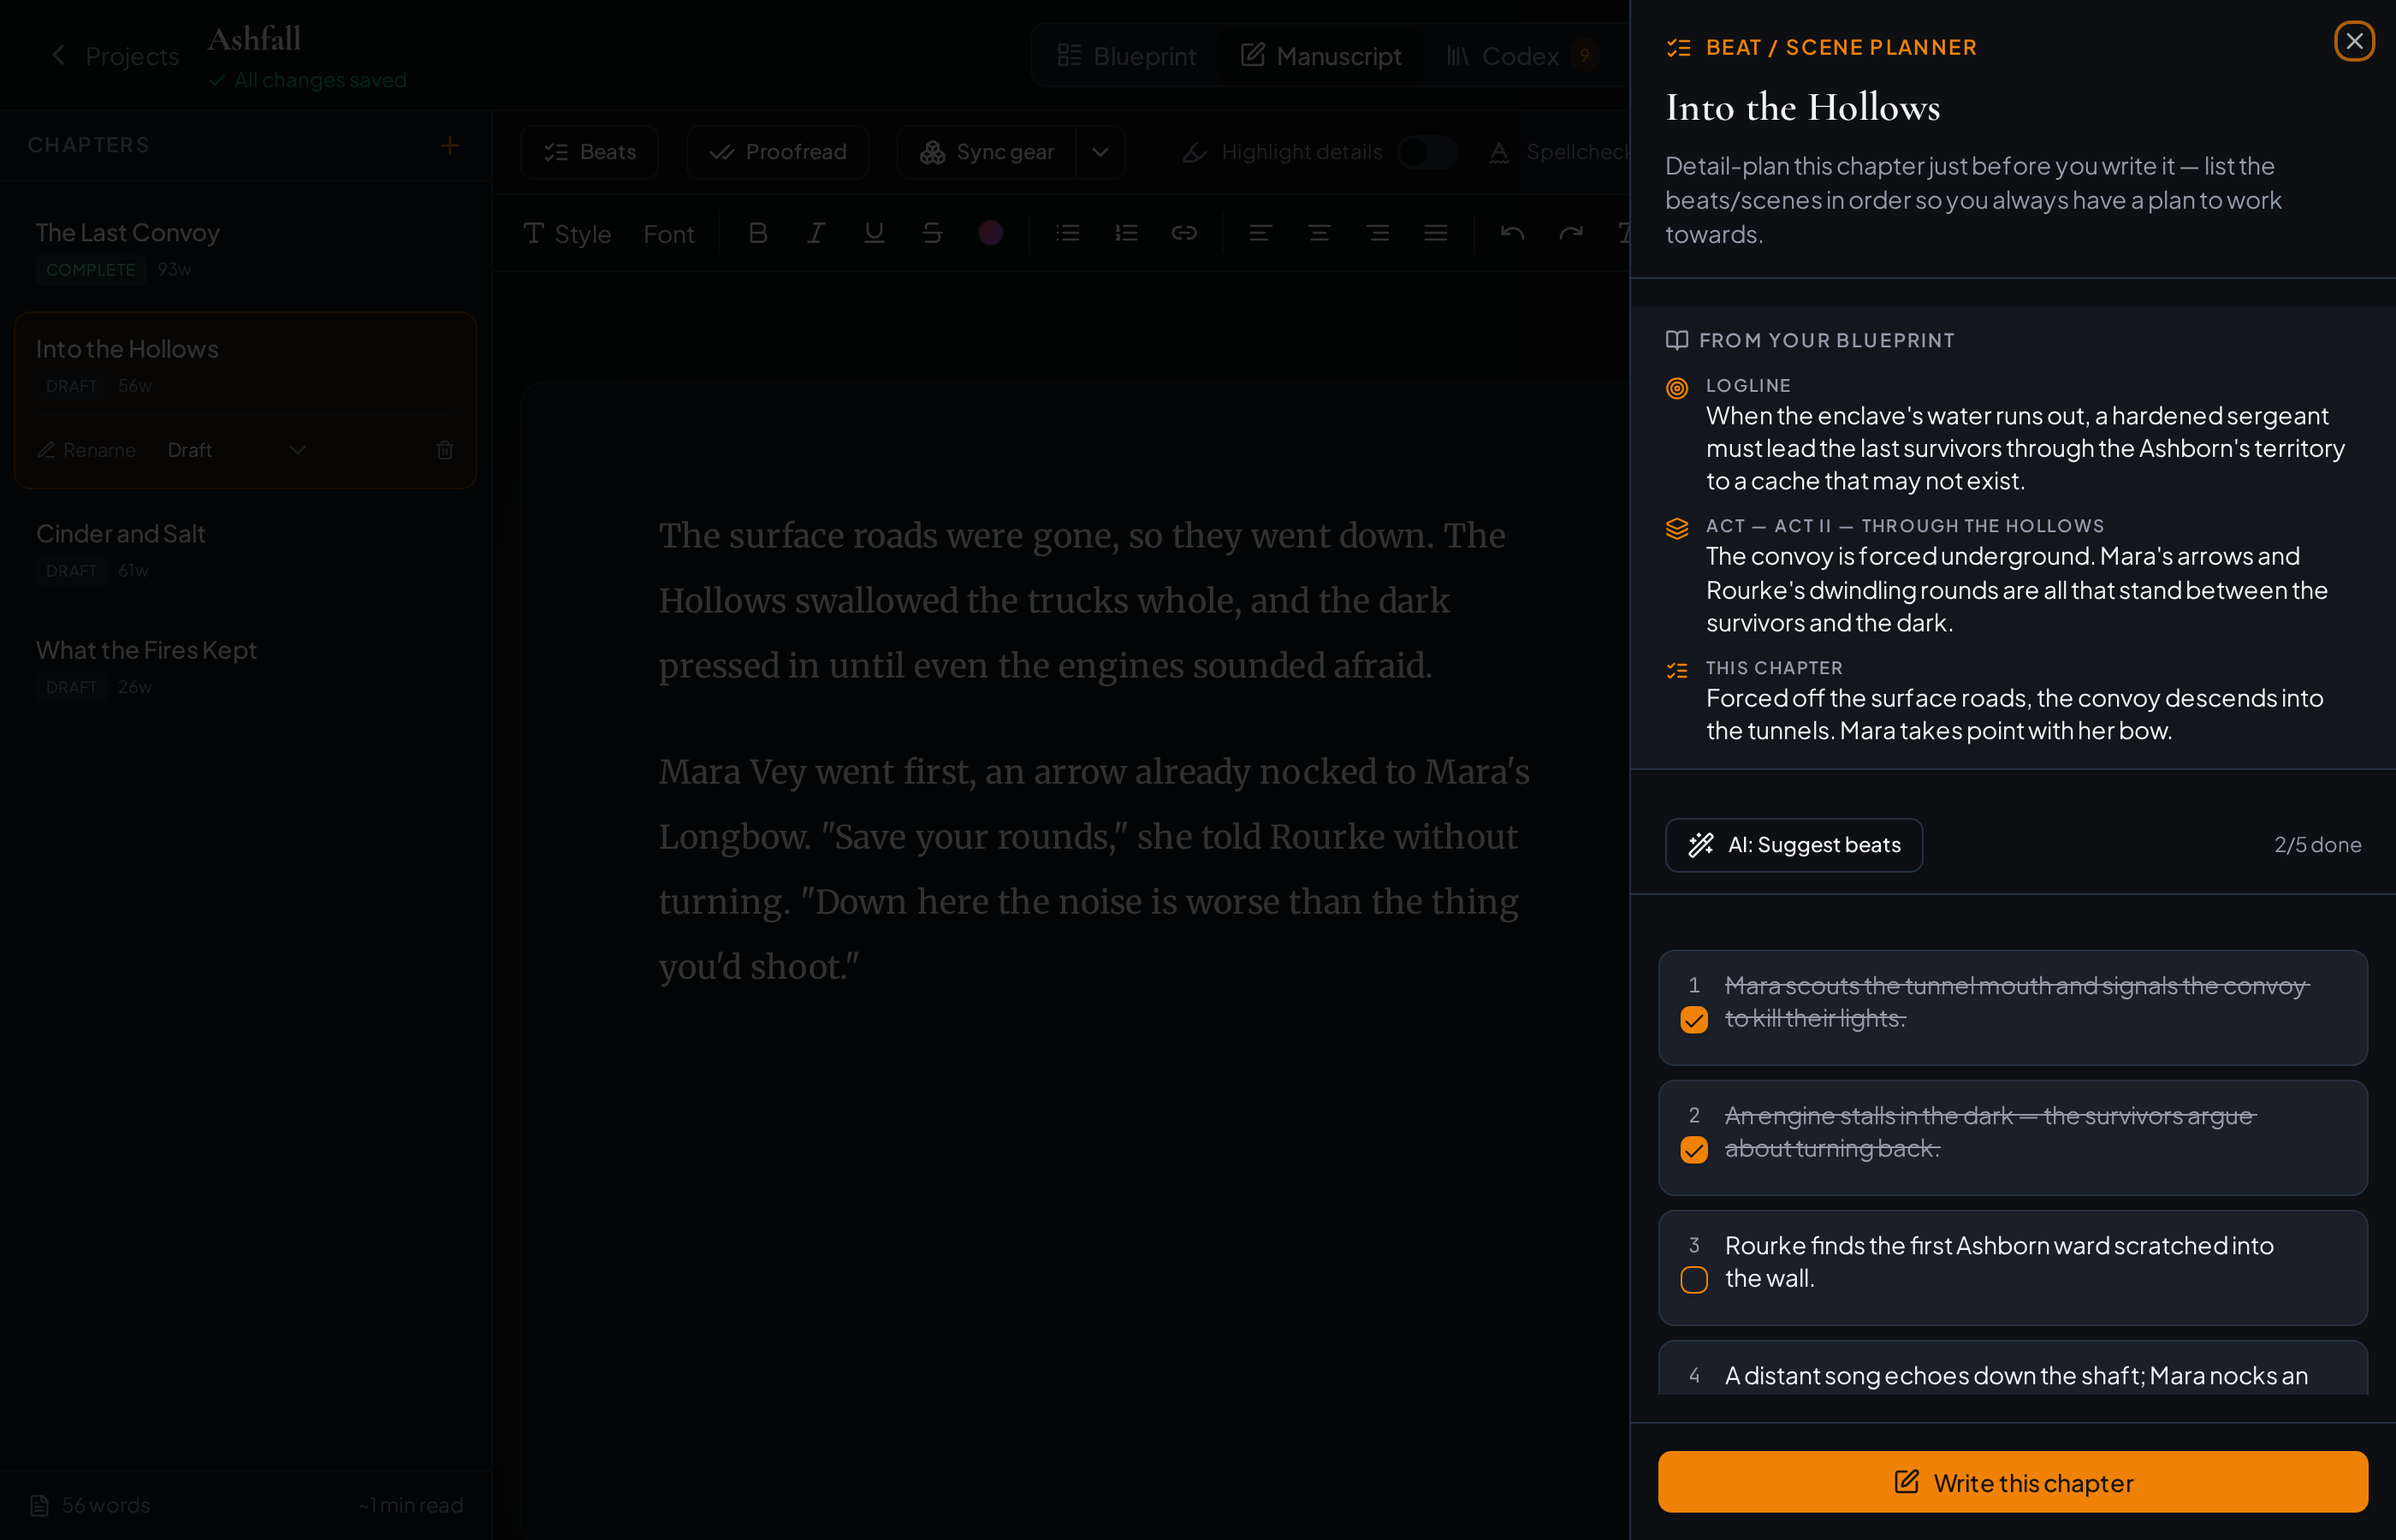
- 1Open Beats from the manuscript toolbar on any chapter.
- 2Add beats in the order they'll happen, and tick each one off as you draft it.
- 3Reorder or remove beats as the scene takes shape.
- 4Short on ideas? Let 'AI: Suggest beats' draft a plan from your logline and chapter summary.
4. Write & auto-highlight
The Manuscript view is a focused, Word-class editor. As you write, CodexStudio recognises the details that matter.
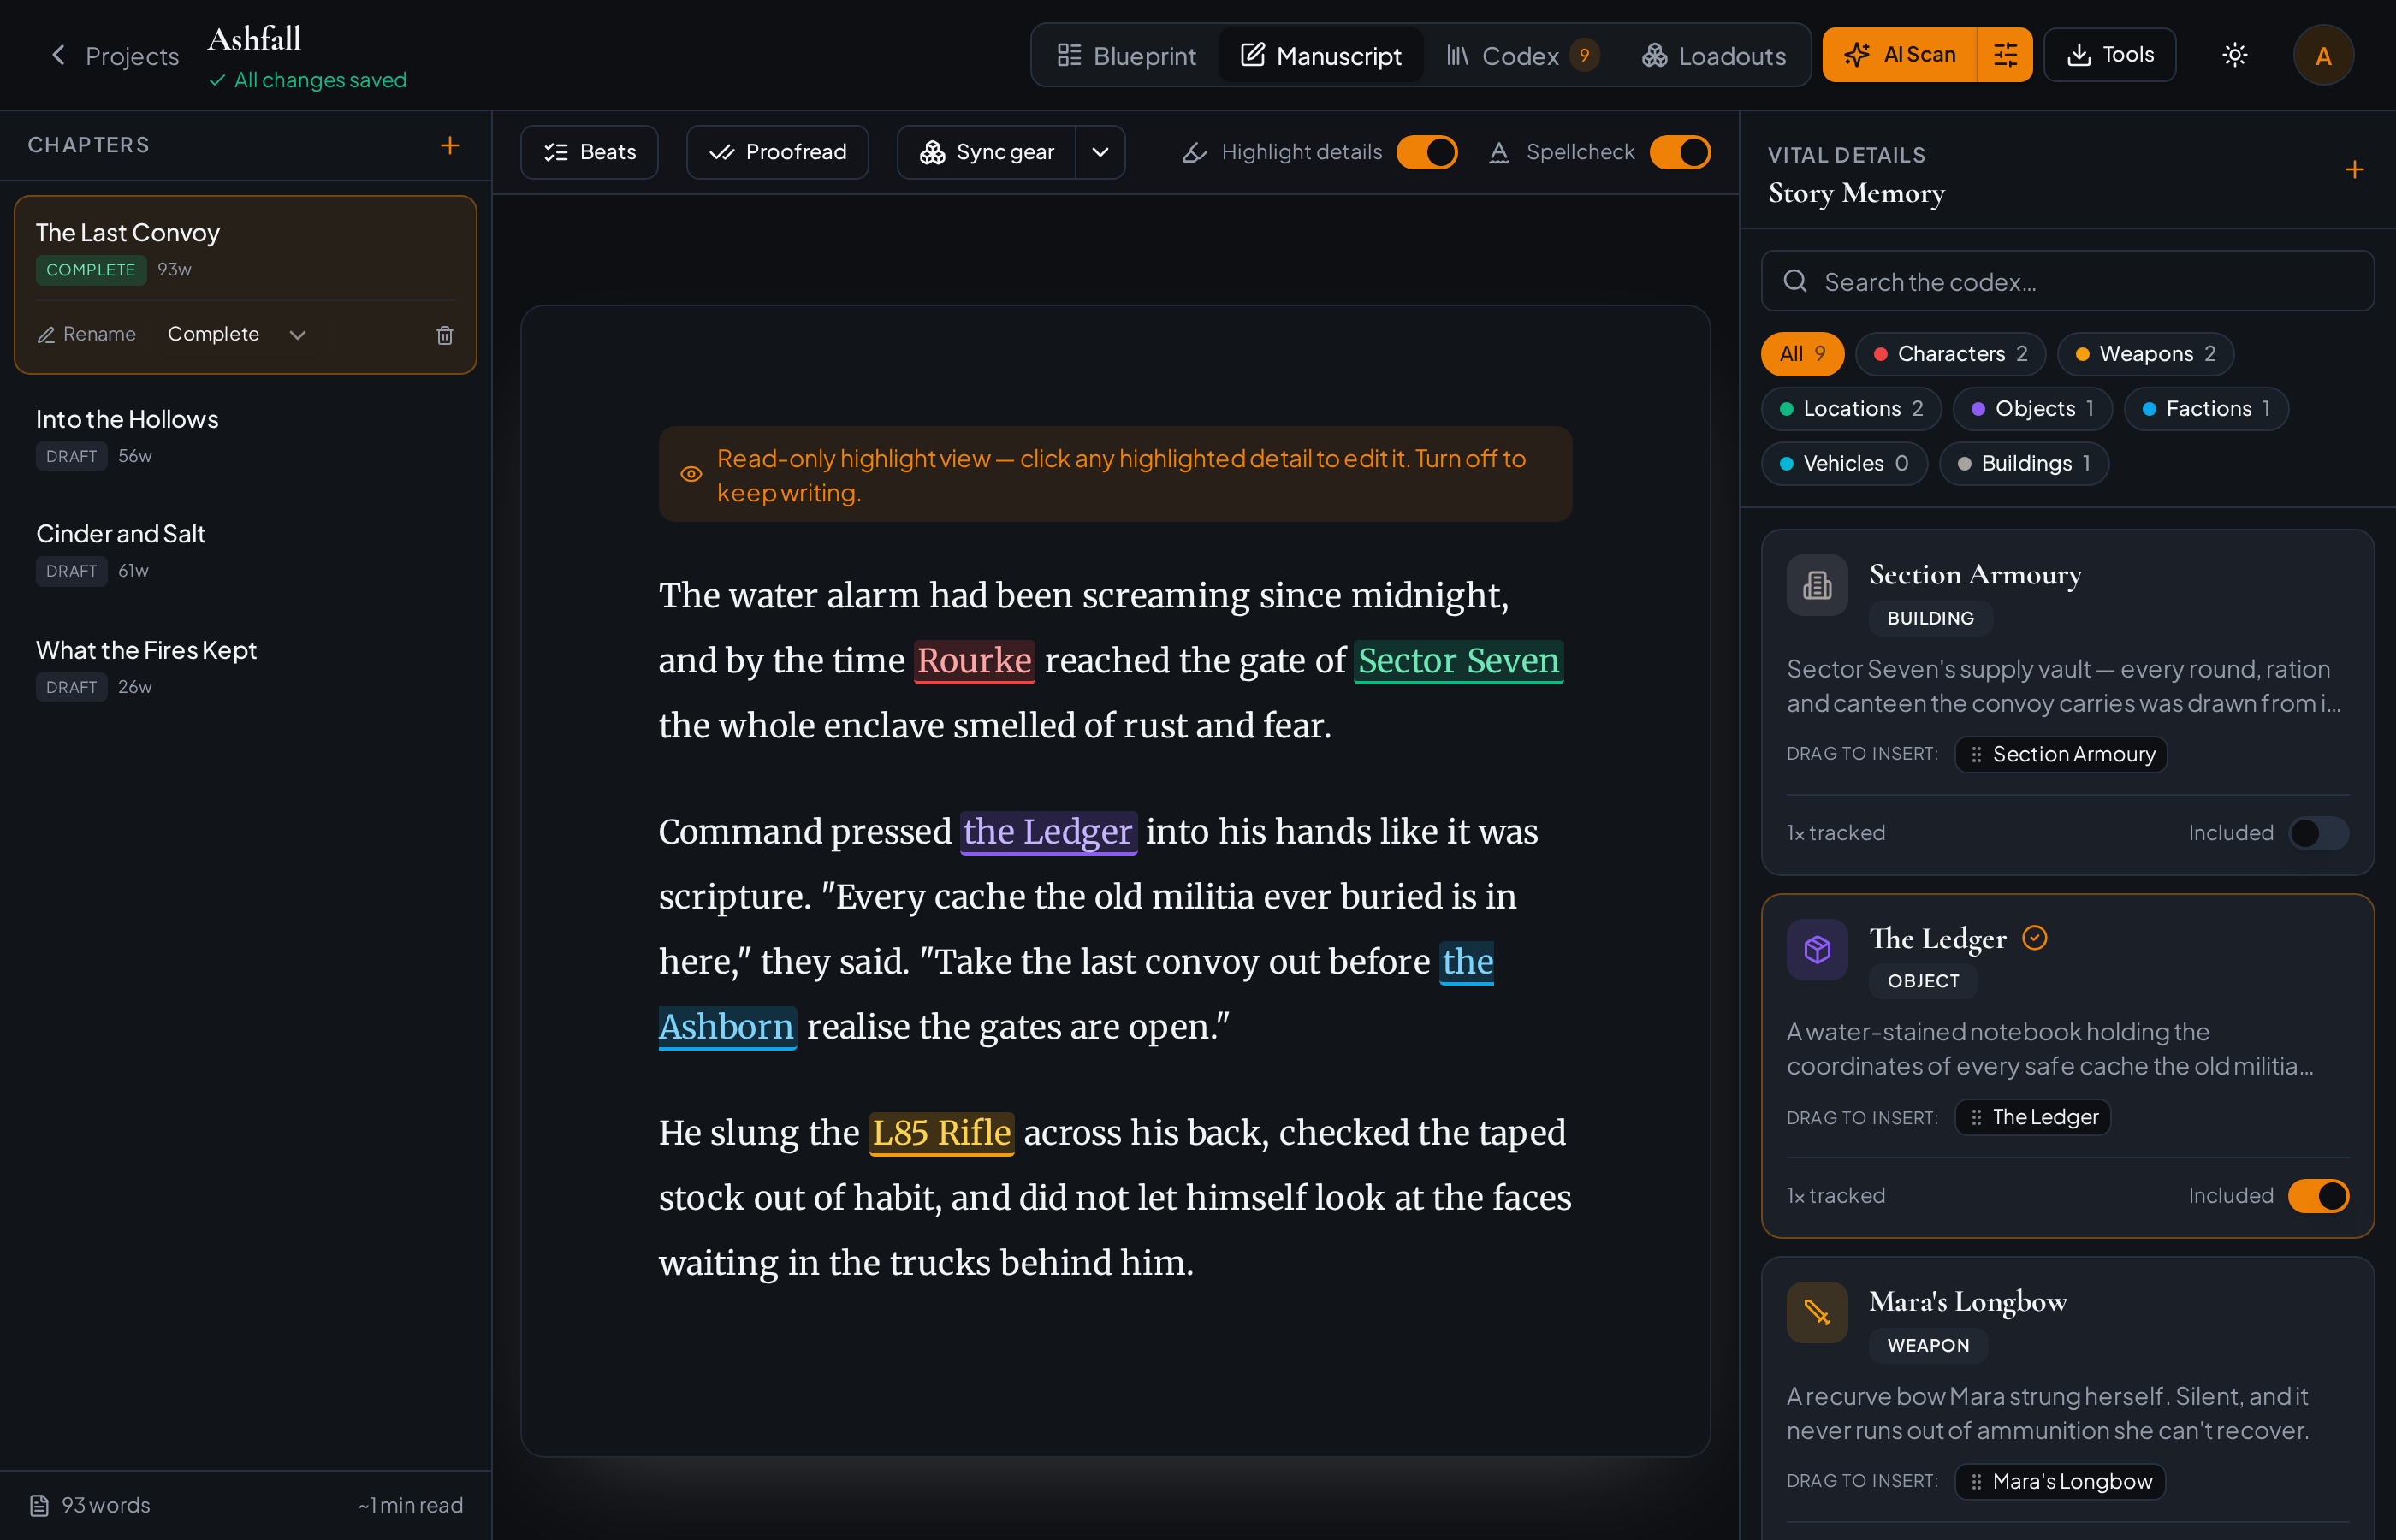
- 1Draft in the centre canvas — everything autosaves as you type.
- 2Chapters number themselves automatically (Chapter 1, 2, 3…) and renumber if you add, reorder or delete one — any custom titles like 'Prologue' are kept and skipped in the count.
- 3Flip on Highlight details to see characters, weapons, places and objects colour-coded in your prose.
- 4Click any highlight to edit that detail — the update reflects across every chapter instantly.
- 5Use the toolbar for headings, styles, lists and links, plus native spellcheck.
5. The Storyboard Codex
The Codex is your story's living memory — a searchable board of every vital detail.
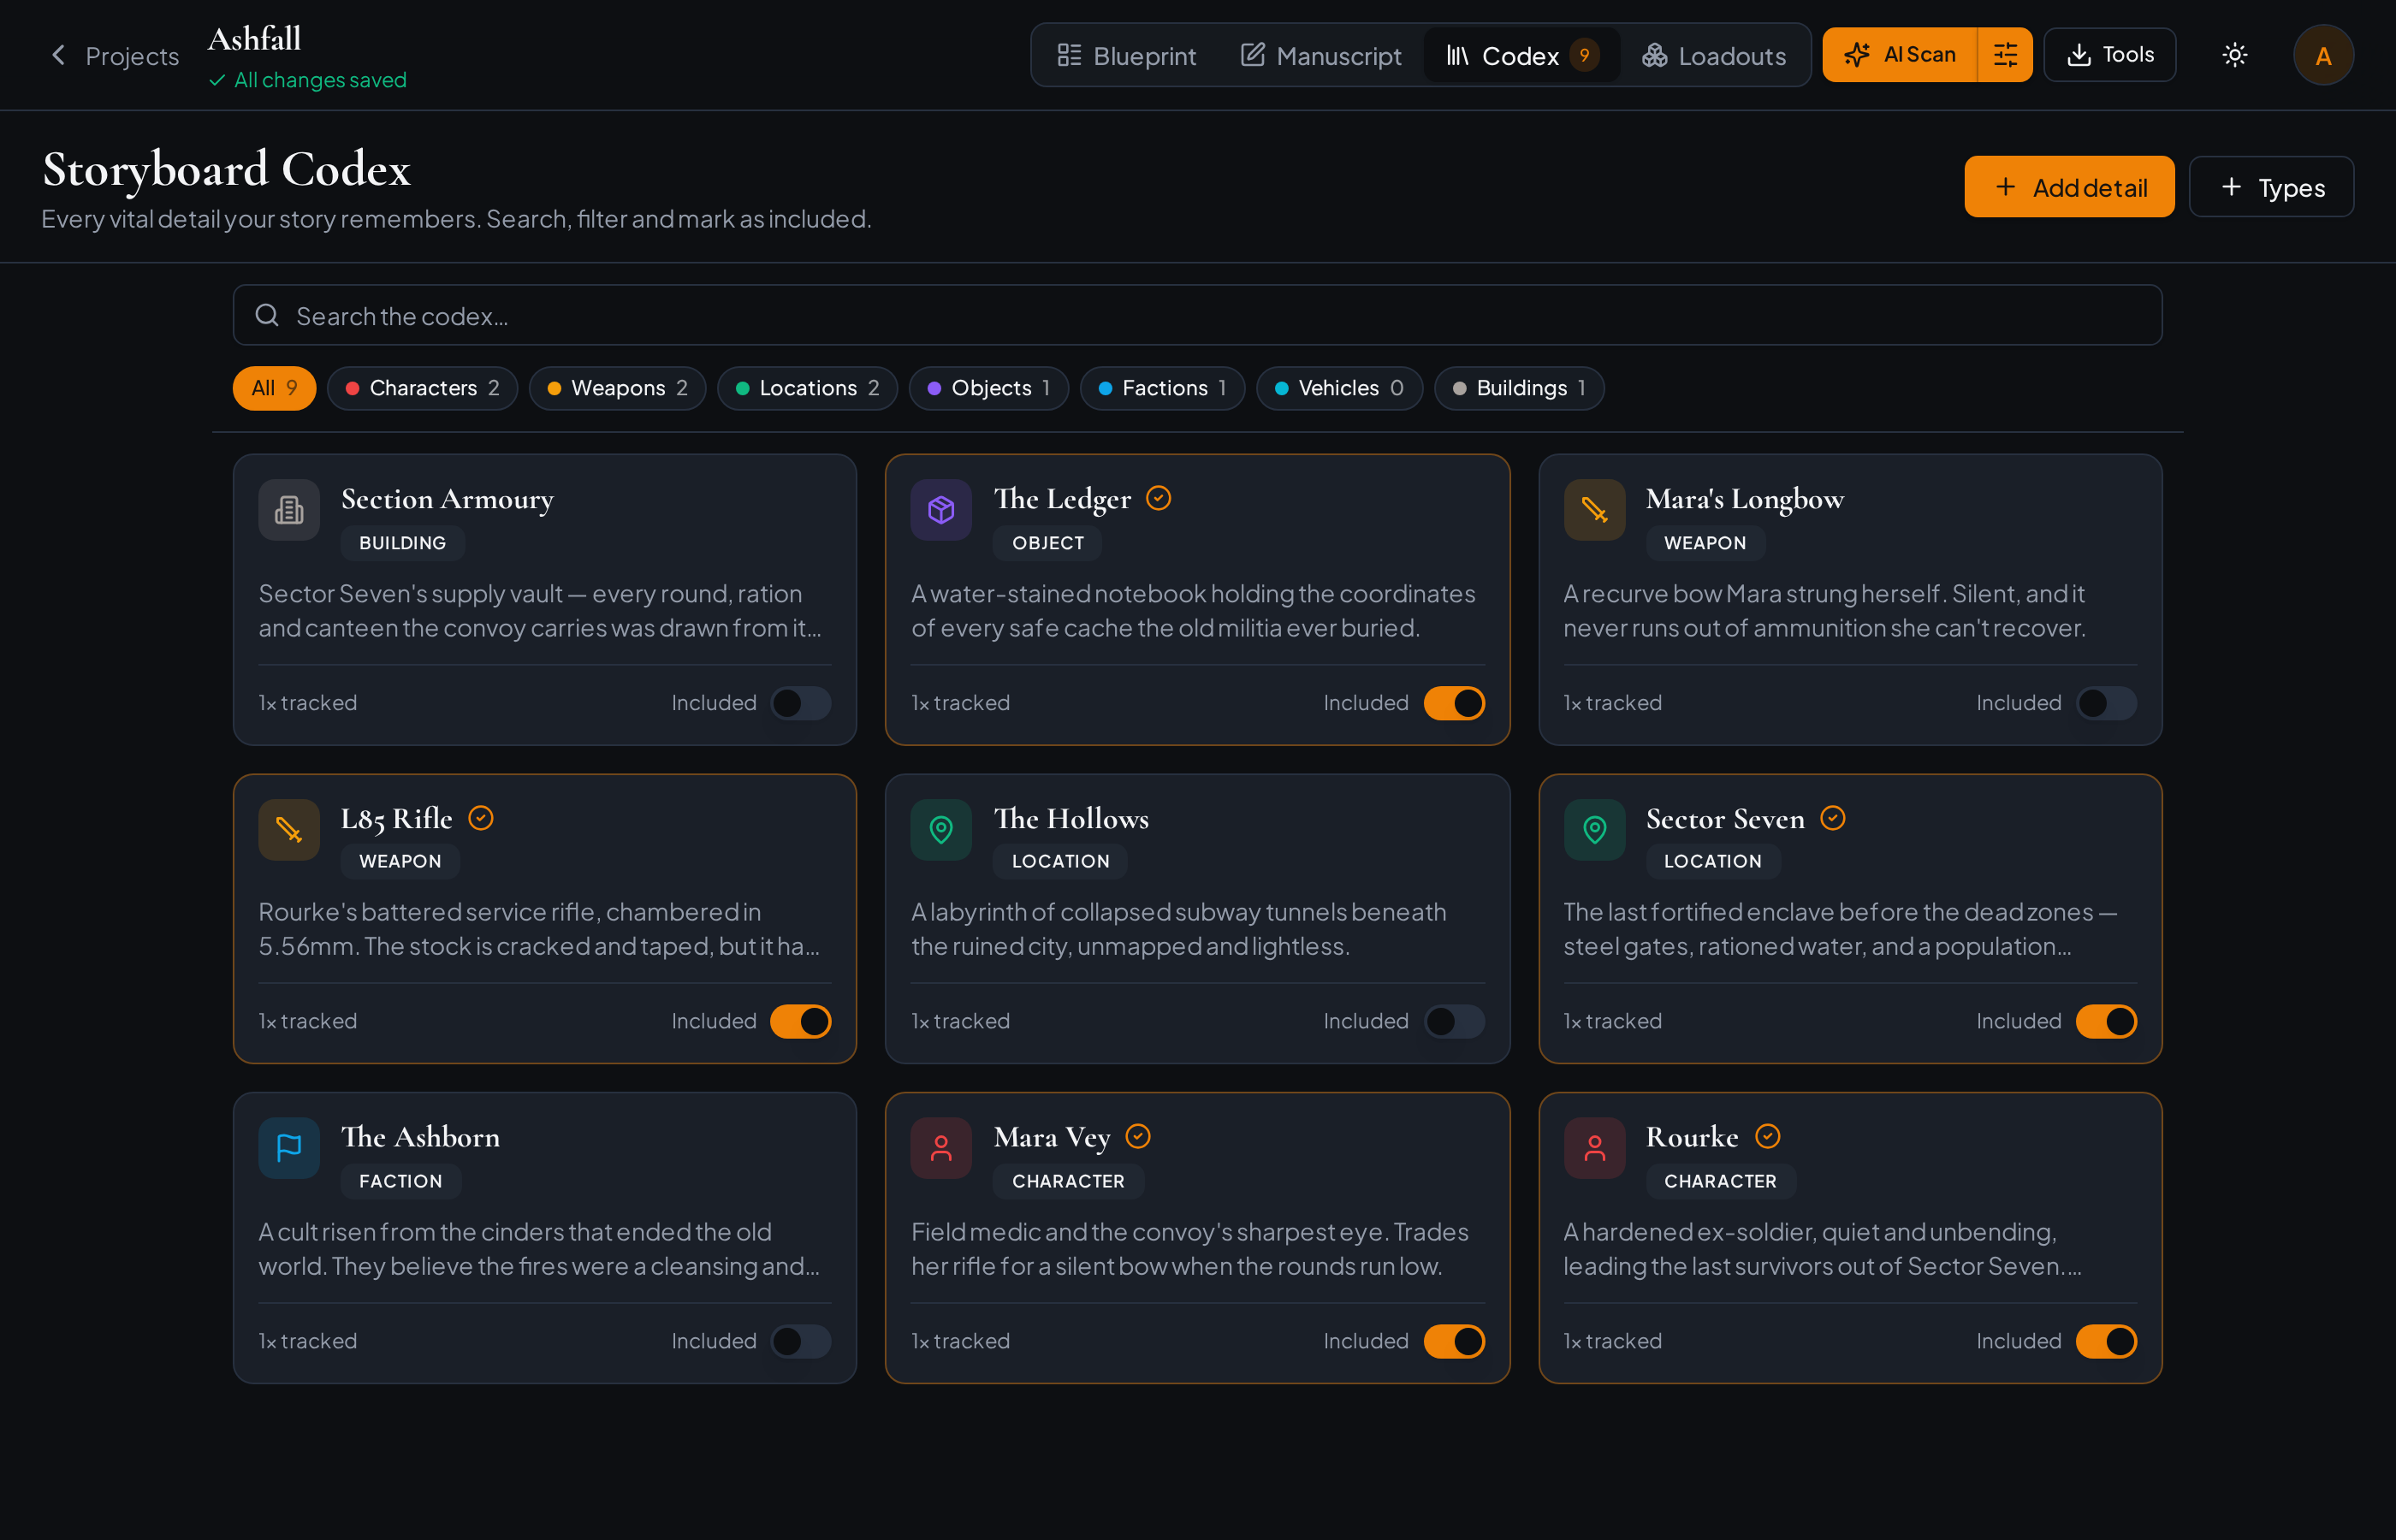
- 1Browse detail cards grouped by type: characters, weapons, locations, objects, factions and more.
- 2Search or filter by type to find anything in seconds.
- 3Toggle Included to mark which details have made it into your draft.
- 4Add your own custom detail types with their own colours — and mark a type as a Kit (like a Med Kit or grab-bag) to give it a contents list.
6. Reusable sections & your Author Bio
Front and back matter you reuse in every book — Prologue, Dedication, About the Author, Acknowledgements, Epilogue — a click away, and never counted in your chapter numbering.
- 1Open the “+” menu in the Chapters list and pick a section — it drops in correctly named and placed at the front or back of your book.
- 2Write your Author Bio once and hit ‘Save as my bio’ — the About the Author section auto-fills with it in every book.
- 3‘Manage sections’ lets you add, rename or remove sections and set front/back placement — per book, or ‘Save as my default’ for future books.
- 4Sections are ordinary chapters once added, so you can move them anytime with the up/down arrows or by dragging on the Blueprint.
7. AI Detail Scan & sensitivity
Let the AI read a chapter and surface the details worth tracking — with you in control of how much it captures.
- 1Open AI Scan from the studio toolbar to sweep the current chapter.
- 2Choose a sensitivity: Key details only, Balanced, or Everything.
- 3Prefer to review first? Switch to 'Review first' and tick exactly which details enter your Codex.
- 4Run Proofread anytime for a spelling and grammar pass.
8. Loadouts & Gear Sync
For action, survival, fantasy and historical fiction, the loadout engine tracks every item, arrow, magazine and ration your characters carry.
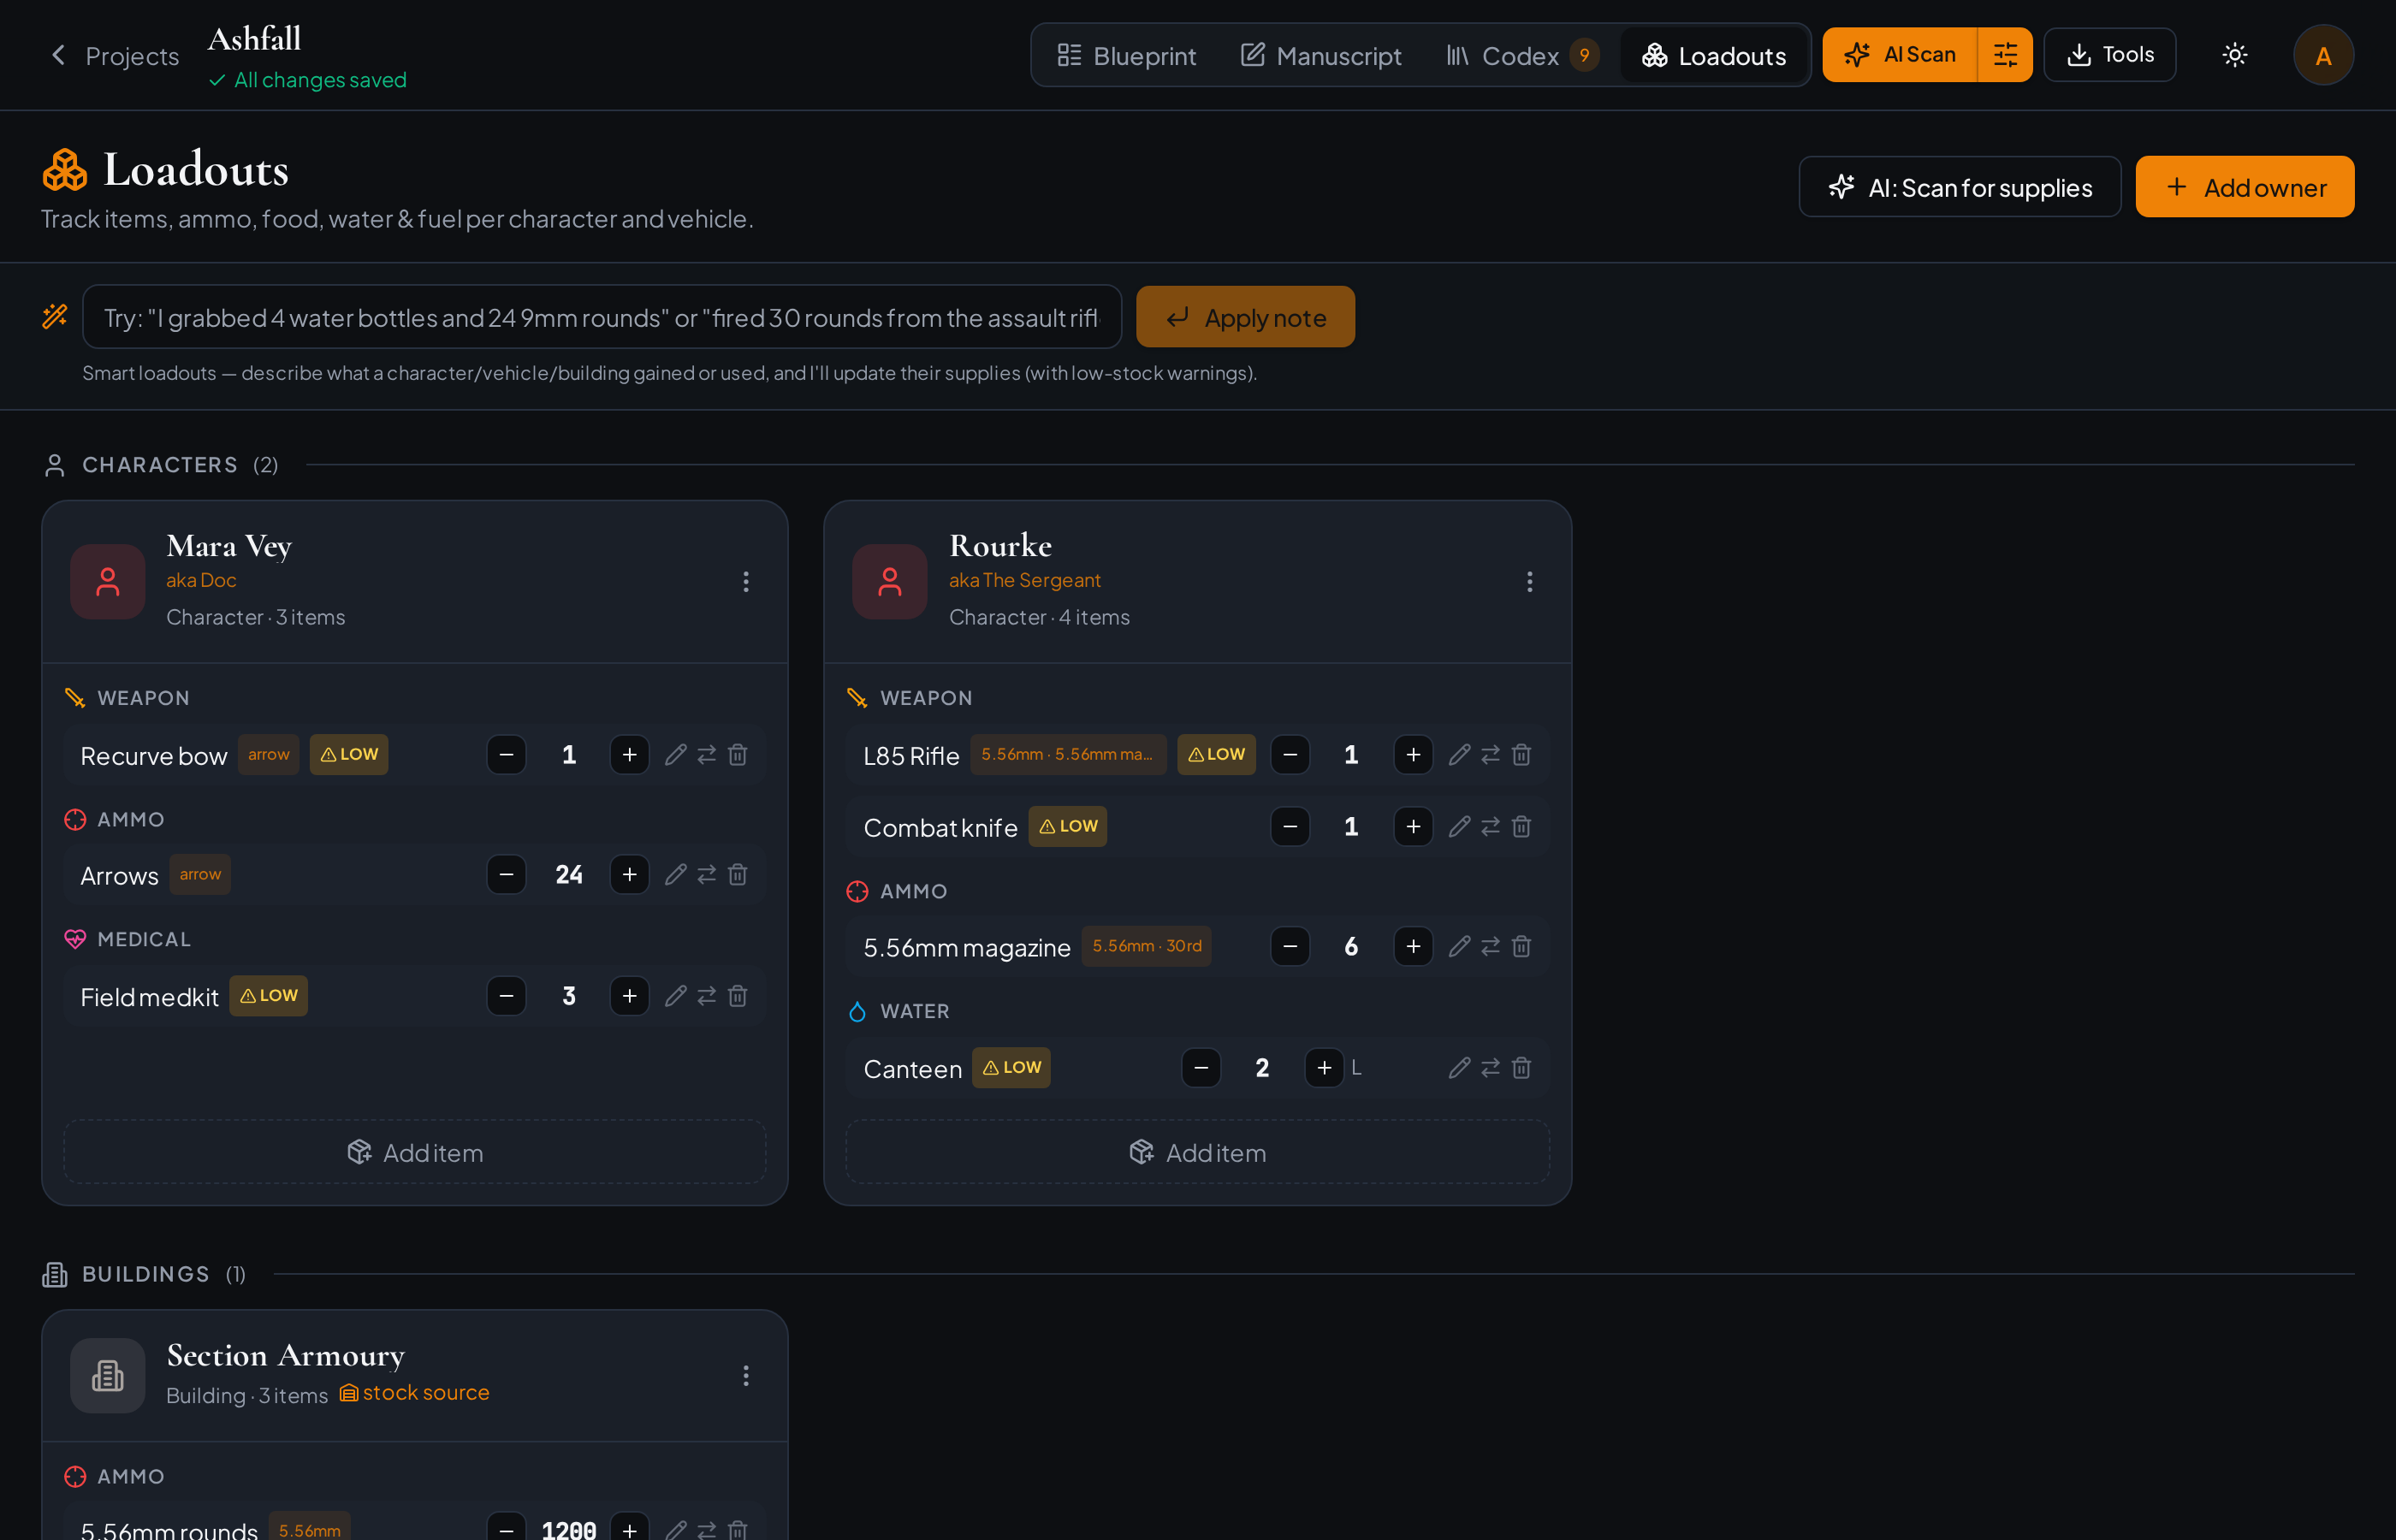
- 1Add owners (characters, vehicles or buildings) and give them gear, ammo, food and water.
- 2Ammo is any consumable type — 5.56mm rounds, shotgun shells, arrows or musket balls — and each weapon can carry its own calibre and magazine size (create a weapon in the Codex once and it's remembered everywhere).
- 3Mark a store like an armoury or quiver as a stock source so kit drawn from it is deducted automatically.
- 4Build a Kit in your Codex (say a Med Kit with 6 bandages and 2 tourniquets) — when a character picks it up, its contents auto-fill their loadout as a tick-off checklist.
- 5Type a plain-English note — 'fired 30 rounds', 'loosed a dozen arrows', 'down to two mags' (an absolute ammo-check) or 'restocked the med kit' — and let it update the counts and kit checklists.
- 6When a character is killed, a Gear Sync scan suggests marking them KIA (you confirm) — dead characters are frozen from gaining gear, but you can loot their kit onto the living and Redistribute ammo across the squad.
- 7Use Sync gear on a chapter to scan the scene, review each change, and watch for low-stock and continuity warnings.
9. Write across devices & windows
CodexStudio keeps your work safe whether you write on one screen or several — and can pop out onto a second monitor.
- 1Your manuscript is protected by auto-refresh, a save-guard that blocks stale overwrites, and a Version History you can restore from.
- 2Tick ‘Keep me signed in’ at login to stay signed in; untick it on a shared device to sign out when the browser closes.
- 3On the Codex, Loadouts and Blueprint, hit ‘Pop out’ to open that panel in its own resizable window — ideal for a second monitor.
- 4Edits sync live across every open window in about a second, and each pop-out remembers its size.
- 5Install CodexStudio as an app from your browser to add it to your home screen or desktop.
10. Branching & CYOA
Writing a choose-your-own-adventure? Switch a project to Branching mode and build interactive paths.
- 1Toggle Linear ↔ Branching from the Blueprint header (your data is kept either way).
- 2Give any section choices, each linking to an existing or brand-new section.
- 3Open the visual Map to see your whole story as a node-and-arrow graph, with Start, endings and orphans flagged.
12. Save, sync & export
Your work is always yours — and always backed up.
- 1Everything autosaves — you'll see 'All changes saved' in the header, and past versions are kept so you can roll back.
- 2Export a clean manuscript to PDF or Word (.docx), or take your codex with you as data.
- 3Upload cover art to each project to make your desk feel like a real bookshelf.
Ready to start writing?
Your first project takes less than a minute to create.